TechTimeGuide

Technology

Building Micronaut Microservices Using MicrostarterCLI
Technology

Building Micronaut Microservices Using MicrostarterCLI

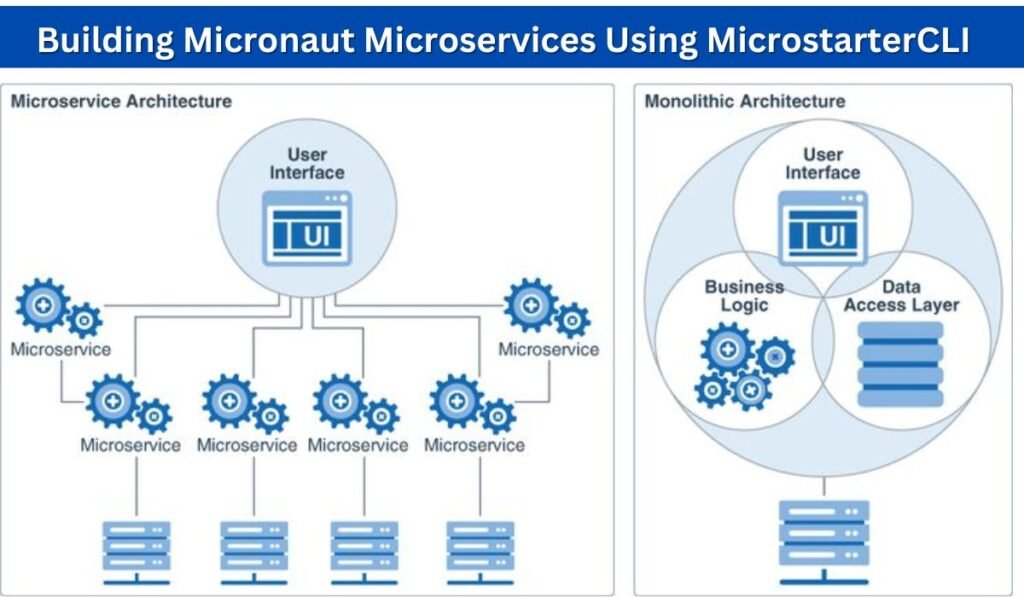
Microservices architecture has rapidly gained popularity due to its scalability, resilience, and the ability to build independent services. One of the powerful frameworks to achieve microservices is Micronaut. It is designed to provide a fast startup time and a minimal memory footprint, making it highly suitable for developing lightweight services. However, creating and configuring microservices manually can be a cumbersome task. Enter Building Micronaut Microservices Using MicrostarterCLI, a tool specifically designed to simplify the process of creating Micronaut-based microservices. This article will walk you through the essential steps to build microservices using Micronaut with the help of MicrostarterCLI. Why Choose Micronaut for Microservices? Before diving into how to use Building Micronaut Microservices Using MicrostarterCLI, it’s essential to understand why Micronaut is an excellent choice for microservices architecture. Unlike other Java frameworks, Micronaut is built from the ground up to support the microservices ecosystem. Here’s why Micronaut excels: Introduction to MicrostarterCLI Building Micronaut Microservices Using MicrostarterCLI is a command-line tool that helps developers quickly scaffold a Micronaut project. The goal is to speed up the creation of microservices by providing pre-configured templates and ready-to-use components. With MicrostarterCLI, you don’t have to worry about setting up the basic configurations from scratch—it takes care of that for you. Some of the features of MicrostarterCLI include: Now, let’s dive into how to use MicrostarterCLI to build microservices with Micronaut. Getting Started with Building Micronaut Microservices Using MicrostarterCLI 1. Installation of MicrostarterCLI To begin building your microservices, the first step is to install MicrostarterCLI. It’s a simple process: bashCopy code $ npm install -g microstartercli After installing, you can verify the installation by running: bashCopy code $ microstartercli –version You should now see the version number, confirming that the CLI is installed correctly. 2. Generating a New Micronaut Project Once MicrostarterCLI is installed, creating a new Micronaut microservice is straightforward. The CLI provides a simple command to scaffold a new project: bashCopy code $ microstartercli create-app my-micronaut-app This command generates a Micronaut application with basic configurations, such as a predefined project structure, essential dependencies, and example code. This significantly reduces the time and effort required to get started. 3. Configuring Dependencies MicrostarterCLI provides predefined templates that handle dependencies out of the box. However, if you need to add additional dependencies specific to your project, it’s easy to do. For instance, you might want to include a messaging service like Kafka or an ORM tool like Hibernate. To add a dependency manually, you can modify the build.gradle or pom.xml (depending on your build tool). Here’s how you can add Kafka support in Gradle: gradleCopy code dependencies { implementation “io.micronaut:micronaut-kafka”} After adding the dependencies, run the following command to refresh your project: bashCopy code$ ./gradlew build 4. Building RESTful APIs Micronaut’s native support for REST APIs makes it an excellent choice for building RESTful microservices. MicrostarterCLI simplifies this further by providing boilerplate code to build REST endpoints. For example, to create a simple controller that handles HTTP requests, use the following command: bashCopy code $ microstartercli create-controller UserController This command will generate a basic controller: javaCopy code @Controller(“/users”)public class UserController { @Get(“/”) public List<User> listUsers() { return new ArrayList<>(); }} In this example, the UserController is set up to handle HTTP GET requests at the /users endpoint, returning a list of users. This is just the starting point; you can further enhance the functionality as needed. 5. Setting Up Database Connectivity Most microservices require some form of persistent data storage. Micronaut supports a wide range of databases, and integrating a database is seamless with MicrostarterCLI. To set up a database, first, ensure the necessary dependencies are added: gradle Copy code dependencies { implementation “io.micronaut.data:micronaut-data-hibernate-jpa” implementation “io.micronaut:micronaut-jdbc-hikari”} Then, update your application.yml file to include your database configurations: yamlCopy codedatasources: default: url: jdbc:mysql://localhost:3306/mydb driverClassName: com.mysql.cj.jdbc.Driver username: root password: password After configuring the database, you can use Micronaut’s Data feature to create repositories: javaCopy code@Repository public interface UserRepository extends CrudRepository<User, Long> { } This repository provides basic CRUD operations for interacting with the User entity. 6. Message-Driven Microservices One of the advantages of microservices architecture is the ability to decouple components using messaging systems like Kafka, RabbitMQ, or others. Micronaut has native support for building message-driven microservices. To add Kafka to your microservice, first add the necessary dependencies, as shown earlier. Then, create a Kafka consumer by running the following command: bash Copy code$ microstartercli create-consumer KafkaConsumer Here’s a basic Kafka consumer example: javaCopy code@KafkaListener(offsetReset = OffsetReset.EARLIEST) public class KafkaConsumer { @Topic(“user-topic”) public void receive(String message) { System.out.println(“Received message: ” + message); } } This consumer listens to the user-topic and processes incoming messages. 7. Testing Micronaut Microservices Testing is an integral part of the development process, especially when dealing with microservices. Micronaut has built-in support for testing, and MicrostarterCLI sets up the testing framework automatically. To run the tests, simply use the command: bashCopy code$ ./gradlew test This will execute the unit and integration tests for your microservices, ensuring they work as expected. Deploying Micronaut Microservices Deploying Micronaut microservices is straightforward, especially with modern cloud platforms like AWS, Google Cloud, or Azure. Micronaut’s lightweight footprint makes it an excellent fit for Docker and Kubernetes environments. 1. Dockerizing Your Microservice To dockerize your Micronaut microservice, you can generate a Dockerfile using MicrostarterCLI: bashCopy code$ microstartercli create-dockerfile Once the Dockerfile is created, build the Docker image: bashCopy code$ docker build -t my-micronaut-app . After building the image, you can run your microservice using Docker: bashCopy code$ docker run -p 8080:8080 my-micronaut-app 2. Kubernetes Deployment If you’re using Kubernetes, you can deploy your Dockerized microservice by creating a deployment file: yaml Copy code apiVersion: apps/v1kind: Deploymentmetadata: name: micronaut-appspec: replicas: 2 selector: matchLabels: app: micronaut-app template: metadata: labels: app: micronaut-app spec: containers: – name: micronaut image: my-micronaut-app ports: – containerPort: 8080 This ensures that your microservice is scalable and resilient within a Kubernetes cluster. Conclusion Building microservices using Building Micronaut Microservices Using MicrostarterCLI is a streamlined and efficient process. With MicrostarterCLI’s ability to scaffold projects, set up dependencies, and integrate essential services

Deleted Cluster Node Still Showing in Proxmox
Technology

How to Resolve Deleted Cluster Node Still Showing in Proxmox

Proxmox is a powerful and flexible open-source platform for enterprise virtualization, offering robust solutions for managing clusters of virtual machines (VMs). However, one issue that administrators may encounter is when a deleted cluster node still showing in proxmox interface. This can be frustrating, as it can cause confusion and potentially lead to operational inefficiencies. In this comprehensive guide, we will walk you through the steps to resolve this issue, ensuring your Proxmox environment remains clean and efficient. Understanding the Problem: Deleted Cluster Node Still Showing In Proxmox Before diving into the solution, it’s crucial to understand why a Deleted Cluster Node Still Showing In Proxmox. When you remove a node from a Proxmox cluster, the system may not immediately update its status across all components of the cluster. This can occur due to various reasons, such as: Understanding these root causes can help in applying the correct solution to remove the lingering node entry. Step-by-Step Guide to Remove Deleted Cluster Node Still Showing In Proxmox 1. Verify the Node’s Deletion Status The first step is to confirm that the node has indeed been deleted and that there are no lingering processes or services associated with it. You can do this by running the following command: bash Copy code pvecm nodes This command will list all the nodes currently recognized by the cluster. If the node you intended to delete is still listed, proceed with the next steps. 2. Manually Remove the Node from the Cluster Configuration If the node is still listed after deletion, you will need to manually remove it from the cluster configuration files. This can be done by editing the /etc/pve/corosync.conf file. Here’s how: 3. Restart the Proxmox Services For the changes to take effect, you will need to restart the relevant Proxmox services. The easiest way to do this is by rebooting the remaining nodes in the cluster. However, if rebooting is not feasible, you can restart the Proxmox services individually: bash Copy code systemctl restart pve-clustersystemctl restart corosync 4. Check the Cluster Status Once the services have restarted, check the cluster status again to ensure the node has been successfully removed: bash Copy code pvecm status The deleted node should no longer appear in the list. If it does, there may be further issues with the cluster configuration that need to be addressed. Troubleshooting Common Issues Issue: Node Still Appears After Manual Removal If the node still appears after following the above steps, it might be due to a synchronization issue between the cluster nodes. In such cases, try the following: Issue: Corrupted Configuration Files If you suspect that the configuration files are corrupted, restoring from a recent backup may be necessary. Proxmox automatically backs up configuration files, which can be found in the /etc/pve/ directory. To restore a backup: Preventing Future Issues To avoid encountering the issue of deleted nodes still showing in the Proxmox interface, consider implementing the following best practices: Conclusion Dealing with a deleted cluster node still showing in Proxmox can be a challenging issue, but by following the steps outlined in this guide, you can efficiently resolve the problem. Remember to always verify the status of your nodes, manually remove them from the configuration if necessary, and troubleshoot any lingering issues. By maintaining a clean and well-functioning Proxmox cluster, you can ensure a stable and efficient virtualization environment. Also Read More: Gcp Big Query: Powerful Data Analytics For Mass Storage And Analysis Ezwontech.com

Gcp Big Query: Powerful Data Analytics For Mass Storage And Analysis Ezwontech.com
Technology

Gcp Big Query: Powerful Data Analytics For Mass Storage And Analysis Ezwontech.com

Introduction to GCP Big Query Hello Readers! In today’s digital age, data is king. With the exponential growth of data generated by businesses and individuals alike, finding efficient ways to store, process, and analyze this data is crucial. Google Cloud Platform’s (GCP) BigQuery emerges as a robust solution tailored for such tasks. Designed to handle massive datasets with ease, Gcp Big Query: Powerful Data Analytics For Mass Storage And Analysis Ezwontech.com offers unparalleled capabilities in data analytics, making it an indispensable tool for enterprises. What is GCP BigQuery? Gcp Big Query: Powerful Data Analytics For Mass Storage And Analysis Ezwontech.com is a fully-managed, serverless, multi-cloud data warehouse that enables super-fast SQL queries using the processing power of Google’s infrastructure. Unlike traditional data warehouses, which require significant time and resources for setup and maintenance, BigQuery eliminates these hurdles by providing a platform that is both scalable and easy to use. Key Features of Gcp Big Query: Powerful Data Analytics For Mass Storage And Analysis Ezwontech.com How GCP BigQuery Transforms Data Analytics Efficiency in Data Handling One of the standout features of Gcp Big Query: Powerful Data Analytics For Mass Storage And Analysis Ezwontech.com is its ability to process and analyze massive datasets with incredible speed. This is largely due to its distributed architecture, which breaks down large datasets into smaller chunks and processes them in parallel. As a result, complex queries that would take hours or even days to run on traditional systems can be completed in mere seconds or minutes with BigQuery. Cost-Effective Analysis BigQuery operates on a pay-as-you-go pricing model, which means businesses only pay for the data they query. This is a stark contrast to traditional data warehouses, which often require significant upfront investments in hardware and software. With BigQuery, businesses can scale their usage up or down based on their needs, ensuring cost efficiency without compromising performance. Seamless Integration with GCP Ecosystem BigQuery seamlessly integrates with other Google Cloud services, such as Google Analytics, Google Sheets, and Google Data Studio. This integration allows businesses to pull in data from various sources, analyze it in BigQuery, and then visualize the results using Google’s powerful visualization tools. This end-to-end integration simplifies the data pipeline and enhances productivity. BigQuery Use Cases Across Industries Retail In the retail sector, data is generated from multiple sources, including sales transactions, customer feedback, and inventory systems. BigQuery enables retailers to analyze this data in real time, allowing for better inventory management, personalized marketing campaigns, and improved customer experiences. Healthcare Healthcare organizations deal with vast amounts of sensitive data, ranging from patient records to clinical trial results. BigQuery’s robust security features ensure that this data is protected while allowing healthcare providers to run complex queries that can lead to better patient outcomes and more efficient operations. Finance Financial institutions rely heavily on data to drive their decision-making processes. BigQuery allows these organizations to analyze market trends, detect fraudulent activities, and optimize investment strategies, all in real time. Its scalability ensures that even the largest datasets can be processed quickly and accurately. Media and Entertainment For media companies, understanding audience preferences and behavior is key to delivering content that resonates. BigQuery enables these companies to analyze vast amounts of data, from social media interactions to streaming metrics, helping them tailor content to audience demands and optimize their distribution strategies. Optimizing Performance in BigQuery Partitioned Tables One of the ways to optimize performance in BigQuery is by using partitioned tables. Partitioning allows you to divide your data into segments based on a column, such as date. This reduces the amount of data scanned during queries, resulting in faster query performance and lower costs. Clustering Tables Clustering is another powerful feature in BigQuery that optimizes query performance. By clustering tables based on specific columns, BigQuery can quickly locate and retrieve relevant data, speeding up query execution times. Materialized Views Materialized views in BigQuery allow you to store the results of a query and reuse them in subsequent queries. This can significantly reduce the amount of processing required for repetitive queries, leading to faster performance and reduced costs. BigQuery Best Practices Use of Query Caching BigQuery automatically caches query results for 24 hours. If the same query is run again within this period, BigQuery retrieves the results from the cache at no additional cost, saving both time and money. Leveraging this feature can greatly enhance performance for repetitive queries. Avoiding SELECT * While it might be tempting to use the SELECT * statement to retrieve all columns from a table, this can result in scanning more data than necessary, increasing both query time and cost. Instead, it’s advisable to specify only the columns you need. Data Compression and Storage BigQuery uses columnar storage with data compression, which reduces the amount of data scanned during queries. This not only improves performance but also reduces storage costs. Understanding how BigQuery compresses and stores data can help you optimize your data structures for better performance. Conclusion Gcp Big Query: Powerful Data Analytics For Mass Storage And Analysis Ezwontech.com stands out as a powerful and versatile tool for data analytics. Its ability to handle massive datasets, coupled with its real-time analytics, integrated machine learning, and cost-effective pricing model, makes it an essential component of any data-driven organization. Whether you’re in retail, healthcare, finance, or media, BigQuery offers the tools you need to transform your data into actionable insights. Also Read More: Business Intelligence Crm.sarjanaekonomi.co.id: A Complete Guide

Business Intelligence Crm.sarjanaekonomi.co.id
Business, Technology

Business Intelligence Crm.sarjanaekonomi.co.id: A Complete Guide

Hello! In today’s fast-paced business environment, leveraging data to drive strategic decisions is no longer a luxury—it’s a necessity. Business Intelligence Crm.sarjanaekonomi.co.id has evolved to become a cornerstone of effective customer relationship management (CRM). By integrating BI tools with CRM systems, companies can gain deeper insights into customer behavior, optimize marketing strategies, and ultimately boost sales. This comprehensive guide explores the intricate relationship between Business Intelligence and CRM, providing valuable insights for businesses seeking to outperform their competitors. What is Business Intelligence Crm.sarjanaekonomi.co.id? Business Intelligence Crm.sarjanaekonomi.co.id refers to the technologies, applications, and practices used to collect, integrate, analyze, and present business data. The primary goal of BI is to support better business decision-making. By transforming raw data into meaningful information, businesses can gain insights into their operations, identify trends, and make data-driven decisions that enhance their performance. Key Components of Business Intelligence: Understanding Crm.sarjanaekonomi.co.id Crm.sarjanaekonomi.co.id is a strategy and technology used to manage interactions with customers and potential customers. A CRM system helps companies stay connected to customers, streamline processes, and improve profitability. The core function of CRM is to maintain and organize customer information, which can then be used to personalize marketing efforts, enhance customer service, and increase sales. Key Features of CRM Systems: The Integration of Business Intelligence Crm.sarjanaekonomi.co.id The integration of Business Intelligence Crm.sarjanaekonomi.co.id systems can be a game-changer for businesses. By combining these two powerful tools, companies can not only store and manage customer data but also analyze it to gain actionable insights. This integration allows for a more holistic view of customer behavior, preferences, and trends, enabling businesses to make more informed decisions. Benefits of Integrating BI with CRM: Implementing Business Intelligence in CRM Systems Implementing Business Intelligence within a CRM system requires careful planning and execution. Below are the key steps to ensure a successful integration: Step 1: Define Objectives Before integrating BI with CRM, it’s essential to clearly define the objectives. What specific insights are you hoping to gain? How will these insights be used to drive business decisions? Defining these objectives upfront will help guide the implementation process. Step 2: Choose the Right Tools There are many BI tools available, each with its strengths and weaknesses. When choosing a BI tool for your CRM system, consider factors such as ease of use, scalability, integration capabilities, and cost. Some popular BI tools include Tableau, Power BI, and QlikView. Step 3: Data Integration Integrating data from various sources is one of the most challenging aspects of BI implementation. The data from your CRM system must be compatible with your chosen BI tool. This may require data cleansing and transformation to ensure consistency and accuracy. Step 4: Develop Dashboards and Reports Once the data is integrated, the next step is to develop dashboards and reports that provide the insights needed to meet your objectives. These dashboards should be user-friendly and customizable to meet the specific needs of different departments within your organization. Step 5: Training and Support For your BI-CRM integration to be successful, your team must be trained on how to use the new tools and interpret the data. Ongoing support is also essential to address any issues that may arise and to ensure that the system continues to meet the needs of your business. Challenges of Integrating BI with CRM While the benefits of integrating BI with CRM are substantial, the process is not without challenges. Below are some common obstacles that businesses may encounter: Future Trends in Business Intelligence CRM.sarjanaekonomi.co.id As technology continues to evolve, so too will the ways in which BI and CRM are used. Some future trends to watch for include: Conclusion Integrating Business Intelligence CRM.sarjanaekonomi.co.id is a powerful strategy for businesses looking to gain a competitive edge. By leveraging the insights gained from BI, companies can enhance their customer relationships, optimize their marketing strategies, and drive growth. However, successful integration requires careful planning, the right tools, and a commitment to ongoing training and support. Also Read More: Apkipl: Insights into the Latest Tech and Online Earning App

Crane Rental Prices Per Day And 6 Factors Affect Rental Cost Blog.sentigum.com
Technology, General

Crane Rental Prices Per Day And 6 Factors Affect Rental Cost Blog.sentigum.com

When it comes to crane rentals, understanding the costs involved is crucial for managing budgets effectively. The cost of renting a crane can vary significantly depending on several factors. In this article, we delve into the six critical elements that influence daily crane rental prices per day and 6 factors affect rental cost blog.sentigum.com, providing you with comprehensive insights to help you make informed decisions. Crane rental prices per day & 6 factors affect rental cost 1. Type of Crane The type of crane you need is one of the most significant factors affecting rental costs. Cranes come in various shapes, sizes, and functionalities, each designed for specific tasks. Below are some common types of cranes and how their rental costs might differ: 2. Crane Capacity and Specifications Crane capacity, which refers to the maximum weight a crane can lift, directly influences Crane Rental Prices Per Day And 6 Factors Affect Rental Cost Blog.sentigum.com. Cranes with higher lifting capacities tend to be more expensive to rent. For instance: In addition to capacity, other specifications such as the crane’s boom length, reach, and mobility also play a role in determining rental prices. 3. Rental Duration Rental duration is another crucial factor in determining crane rental costs. Generally, the longer you rent the crane, the lower the daily rate. Rental companies often offer discounts for extended rentals, which can significantly reduce the overall cost. For example: 4. Location and Transportation Costs The location of your project site can greatly impact crane rental costs due to transportation expenses. The further the crane needs to be transported, the higher the cost will be. Additionally, the accessibility of the site can also influence transportation and setup fees. Here’s how: 5. Operator Fees Crane rentals often require the services of a certified crane operator. While some rental companies include the operator in the rental package, others charge separately. Operator fees can vary based on several factors: 6. Additional Services and Insurance Finally, additional services and insurance can also affect crane rental costs. Depending on the nature of your project, you may need to budget for the following: Conclusion Understanding the factors that affect crane rental prices per day and 6 factors affect rental cost blog.sentigum.com is essential for accurately budgeting your project. The type of crane, its capacity, rental duration, location, operator fees, and additional services all play a crucial role in determining the overall cost. By carefully considering these factors, you can make informed decisions that optimize both your budget and project efficiency. Also Read More: Hotel.tribratatv.id About Review: A Ultimate Guide in 2024

Apkipl
Technology, Education

Apkipl: Latest Tech and Online Earning App 2024

In today’s fast-paced digital era, Apkipl has emerged as a standout platform, gaining significant attention in the world of tech enthusiasts and individuals looking to maximize their online earnings. As we delve deeper into Apkipl, we’ll explore what makes this app unique, how it leverages cutting-edge technology, and how it can become a reliable source of income for users across the globe. What is Apkipl? Apkipl is a comprehensive tech platform designed to provide users with access to the latest technology news, reviews, and online earning opportunities. This innovative app is crafted to cater to a diverse audience, ranging from tech-savvy individuals to beginners seeking to understand and capitalize on the growing trend of digital income streams. The Evolution of Apkipl: A Brief Overview The journey of Apkipl began as a modest website offering tech news and product reviews. However, with the increasing demand for online earning platforms, the creators of Apkipl saw an opportunity to expand its services. Today, It’s a multi-faceted app that not only provides the latest insights into the world of technology but also offers users practical ways to earn money online through various affiliate marketing, freelancing, and investment opportunities. Features that Set Apkipl Apart 1. Real-Time Tech Updates One of Apkipl’s core strengths lies in its ability to deliver real-time updates on the latest trends and developments in the technology sector. Whether it’s the newest smartphone launch, advancements in AI, or breakthroughs in blockchain technology, APK IPL ensures that its users are always in the know. This feature is particularly valuable for tech enthusiasts who need up-to-the-minute information to stay ahead in their field. 2. Comprehensive Online Earning Guides For those interested in monetizing their online presence, Apkipl offers a plethora of detailed guides and tutorials. These resources cover a wide range of topics, from setting up a successful blog to maximizing affiliate revenue. The app also provides insights into emerging earning opportunities, such as cryptocurrency trading and NFT investments, ensuring that users can explore and capitalize on the latest trends in the digital economy. 3. User-Friendly Interface Apkipl is designed with a user-centric approach, offering a seamless and intuitive interface that makes it easy for users to navigate through its various sections. The app is optimized for both desktop and mobile devices, ensuring that users can access its features anytime, anywhere. This accessibility is crucial for users who are constantly on the go and need quick access to information and resources. 4. Expert Reviews and Recommendations Another key feature of APK IPL is its expert reviews and recommendations. The app boasts a team of experienced tech reviewers and financial analysts who provide unbiased opinions on the latest gadgets, software, and investment opportunities. These reviews are backed by thorough research and real-world testing, giving users the confidence they need to make informed decisions. 5. Community and Networking Opportunities Apkipl fosters a vibrant community of like-minded individuals who share a passion for technology and online earning. The app offers various forums and discussion boards where users can exchange ideas, seek advice, and collaborate on projects. This sense of community not only enhances the user experience but also opens up new avenues for networking and professional growth. How to Download the Apkipl App 1. Visit the Official Website To ensure you’re downloading the genuine Apkipl app, start by visiting the official Apk IPL website. You can do this by entering the URL directly into your browser. 2. Locate the Download Section Once on the website, navigate to the Download section. This is usually prominently displayed on the homepage, but you can also find it in the menu. 3. Choose Your Device Apkipl is available for various platforms. Select the version that corresponds to your device: 4. Download the APK File (For Android Users) If you’re downloading the Android version, you’ll typically receive an APK file. Click the download button to start downloading the APK file to your device. 5. Enable Installation from Unknown Sources (Android) Since the Apkipl app may not be available on the Google Play Store, you might need to allow installations from unknown sources: 6. Install the Apkipl App Once the APK file is downloaded, open the file to begin the installation process. Follow the on-screen instructions to complete the installation. 7. Download from the App Store (For iOS Users) If you’re using an iOS device, the process is simpler: 8. Open the Apkipl App After the installation is complete, locate the Apkipl app icon on your home screen or app drawer and tap it to open the app. 9. Sign Up or Log In If you’re a new user, you can sign up for a new account. If you already have an Apkipl account, simply log in with your credentials. 10. Start Exploring Now that you have successfully downloaded and installed Apkipl, you can start exploring its features, including the latest tech news, online earning guides, and more. By following these steps, you’ll be able to download and install the Apk ipl app on your device and begin taking advantage of all it has to offer. Maximizing Your Earnings with Apkipl 1. Affiliate Marketing One of the most popular ways to earn money through Apk ipl is via affiliate marketing. The app provides a platform for users to promote products and services from a variety of industries. By leveraging Apkipl’s extensive network of partners, users can earn commissions for every sale generated through their referral links. The app also offers tips and strategies on how to optimize affiliate campaigns, ensuring maximum profitability. 2. Freelancing Opportunities Apkipl connects users with a wide range of freelancing opportunities in fields such as writing, graphic design, web development, and digital marketing. The app features a dedicated section where users can browse available projects, submit proposals, and communicate with potential clients. For those new to freelancing, Apk ipl offers tutorials on how to build a successful freelance career, including tips on pricing, portfolio creation, and client management. 3. Investment in Digital Assets With the rise of cryptocurrencies

Scroll to Top